

Lesson 6, "Buttons," taught you how to create a very simple button. In this section, you create a more complex button that animates when the mouse rolls over it and displays label text with transparency. To create an animated button, you place an animated movie clip symbol in one of the button's frames. Begin by creating the animation.
| 1 | Double-click the icon for the BUTTON - HOME symbol in the Library window to open the symbol for editing. |
Be sure to click the symbol icon, not the symbol name, otherwise you just edit the symbol name.

|
|
| BUTTON - HOME is a partially completed button included to save you a few steps. | |
| 2 | Choose View > Show Frame to center the button in the window. Click the magnifier tool in the toolbox to enlarge the button if necessary. |
| 3 | In the Timeline, name the first layer "Button." |
| 4 | Insert a keyframe in the Over frame in the Button layer.

|
| 5 | Making sure the keyframe in the Over frame is still selected, click anywhere on the Stage with arrow tool to deselect the button image. |
| 6 | Drag an instance of the BUTTON - CROSS symbol from the Library to the registration point in the BUTTON - HOME symbol.

|
| BUTTON - CROSS is a movie clip symbol that already contains an animation of a rotating cross. The instance of BUTTON - CROSS should line up exactly with the cross underneath. You can use the arrow keys to move the selection one pixel at a time. | |
Add text transparency to the button
First, add the transparent text layer to the button.
| 1 | In the Timeline, insert a new layer and name it "Text Transparency." |
| 2 | Select the Text Transparency layer in the Timeline and drag it below the Button layer in the Timeline. |
| Arranging layers this way makes the content of the Text Transparency layer appear behind the content of the Button layer. | |
| 3 | Create a keyframe in the Over frame in the Text Transparency layer.

|
| 4 | Select the BUTTON - BACKGROUND symbol in the Library, and then drag it so that its left side is on the registration point in the button.

|
Now, make the button background blend nicely with any background by applying an alpha setting to it.
| 1 | With BUTTON - BACKGROUND still selected in the work area, choose Modify > Instance. |
| 2 | Click the Color Effect tab in the Instance Properties dialog box, and choose Alpha from the Color Effect pop-up menu. |
| 3 | Enter 50 as the Alpha value, and click OK. |
| 4 | Making sure the Over keyframe in the Text Transparency layer is still selected, click the text tool. |
| 5 | Use the text tool modifiers to choose Arial (Windows) or Helvetica (Macintosh), 18 points, bold, italic text. |
| 6 | Enter the word "Home" over the BUTTON - BACKGROUND symbol.

|
| You don't need to change the content of any other frames in the button. | |
The button you just created displays "Home" when you roll over it. Now, you need to create another button that displays "Contact" when you roll over it. To save time, you'll duplicate the BUTTON - HOME and then change its text.
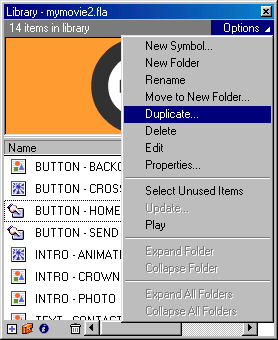
| 1 | In the Library, click the BUTTON - HOME symbol, and then choose Duplicate from the Library Options menu.

|
| 2 | Name the duplicate symbol "BUTTON - CONTACT," and click OK. |
| 3 | Double-click the new BUTTON - CONTACT symbol in the Library to edit it. |
| If necessary, Choose View > Show Frame to center the button in the window and use the magnifier tool to enlarge the button. | |
| 4 | Select the Over frame in the Text Transparency layer and use the text tool and modifiers to edit the text to read "Contact."

|
| You won't be able to see the buttons animating yet because movie clip animation does not work in the authoring environment. | |
| If you want to see the buttons work, choose Edit > Edit Movie, drag an instance of BUTTON - HOME or BUTTON - CONTACT onto the Stage, and then choose Control > Test Movie. After the movie plays, close the movie window and delete the instance of the button from the Stage. | |